Appearance
JUnit 5: Test Lifecycle, @TestInstance, Parallel Execution & AAA Pattern
The Laboratory Dish Analogy
Imagine a chemistry research laboratory testing water samples for purity. For each test, a technician takes a brand new, sterile petri dish from the cabinet, performs the reaction, records the data, and discards the dish. Why not reuse the same petri dish for the next sample? Because microscopic residues from the first experiment would contaminate the second, yielding corrupt results. In rare cases — such as observing a crystalline structure grow over twenty four hours — the technician intentionally keeps one container across observations.
This analogy explains how JUnit 5 treats test classes. By default, JUnit creates a fresh, brand new instance of your test class for every single @Test method it runs. If your class has five tests, JUnit constructs five separate test class objects. This guarantees absolute test isolation: field values modified by test number one cannot pollute test number two. When you genuinely need to share state across all tests in a class, JUnit lets you opt into single container mode using @TestInstance.
This lecture explores the full lifecycle of a JUnit 5 test, the mechanics of @TestInstance(Lifecycle.PER_METHOD) versus @TestInstance(Lifecycle.PER_CLASS), how to configure parallel test execution, and the industry standard Arrange Act Assert pattern.
The Default Lifecycle: Per Method Instance
In JUnit 5, the default lifecycle is Lifecycle.PER_METHOD.
java
import org.junit.jupiter.api.Test;

class OrderServiceTest {

    private int counter = 0;

    public OrderServiceTest() {
        System.out.println("Constructor called");
    }

    @Test
    void testFirst() {
        counter++;
        System.out.println("testFirst counter: " + counter);
    }

    @Test
    void testSecond() {
        counter++;
        System.out.println("testSecond counter: " + counter);
    }
}
When you run this class, the console prints:
Constructor called
testFirst counter: 1
Constructor called
testSecond counter: 1
Notice that the constructor was called twice, and counter was equal to one in both test methods.
Why does JUnit do this?
- Isolation: Each test runs on its own clean slate. No test can inadvertently alter member fields that subsequent tests rely upon.
- Order independence: Tests can execute in any sequence, or even in random order, without altering the outcome.
- Parallel safety: Because tests do not share an instance, running them concurrently does not produce race conditions on instance fields.
Per Class Lifecycle: @TestInstance(Lifecycle.PER_CLASS)
Sometimes creating a new object per method is undesirable. You may have an expensive setup operation, or you may want tests to verify a sequential state machine where test B validates state produced by test A.
You configure this with @TestInstance:
java
import org.junit.jupiter.api.*;

@TestInstance(TestInstance.Lifecycle.PER_CLASS)
class SequentialWorkflowTest {

    private int counter = 0;

    public SequentialWorkflowTest() {
        System.out.println("Constructor called once");
    }

    @Test
    void stepOne() {
        counter += 10;
        System.out.println("stepOne counter: " + counter); // prints 10
    }

    @Test
    void stepTwo() {
        counter += 5;
        System.out.println("stepTwo counter: " + counter); // prints 15
    }
}
With Lifecycle.PER_CLASS:
- JUnit invokes the constructor only once for the entire test class.
- Both
stepOneandstepTworun on the exact same instance in memory. - Changes to instance fields persist across test methods.
Impact on @BeforeAll and @AfterAll
In standard per method mode, @BeforeAll and @AfterAll methods must be static because JUnit executes them before any instance of the test class exists:
java
// Default per-method mode requires static lifecycle hooks
@BeforeAll
static void setupGlobalResources() {
    startDatabaseContainer();
}
With Lifecycle.PER_CLASS, because an instance already exists before the test suite begins, @BeforeAll and @AfterAll methods can be non static regular methods:
java
@TestInstance(TestInstance.Lifecycle.PER_CLASS)
class DatabaseIntegrationTest {

    private DatabaseConnection connection;

    @BeforeAll
    void setupGlobalResources() {
        // Can be non-static and access instance fields directly
        this.connection = DatabaseConnection.connect();
    }

    @AfterAll
    void tearDownGlobalResources() {
        this.connection.close();
    }
}
The Complete JUnit 5 Lifecycle Pipeline
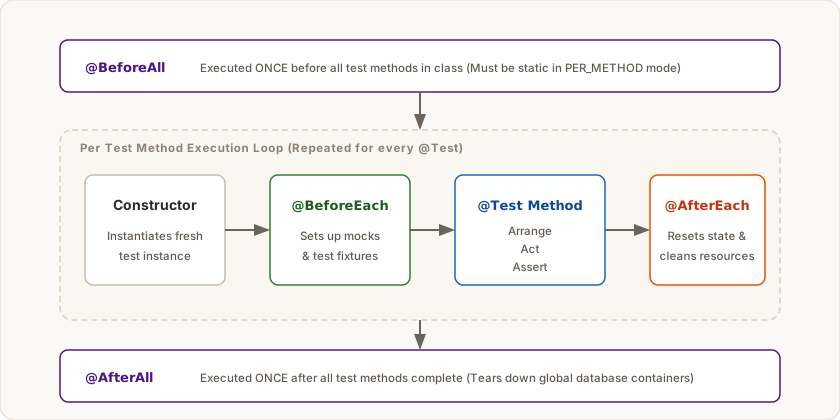
When a test class runs, methods execute in a strict deterministic order:
[Suite Level]
    1. @BeforeAll (executed once before all tests)

[Per Test Loop]
    2. Constructor invoked (in per-method mode)
    3. @BeforeEach (executed before each individual test)
    4. @Test method executes
    5. @AfterEach (executed after each individual test)

[Suite Level]
    6. @AfterAll (executed once after all tests complete)
Here is a full demonstration of the complete execution order:
java
package com.example.testing;

import org.junit.jupiter.api.*;

class LifecycleOrderDemoTest {

    @BeforeAll
    static void beforeAll() {
        System.out.println("1. @BeforeAll - Global setup");
    }

    @BeforeEach
    void beforeEach() {
        System.out.println("2. @BeforeEach - Reset state before test");
    }

    @Test
    void testA() {
        System.out.println("3. Executing test A");
    }

    @Test
    void testB() {
        System.out.println("3. Executing test B");
    }

    @AfterEach
    void afterEach() {
        System.out.println("4. @AfterEach - Cleanup state after test");
    }

    @AfterAll
    static void afterAll() {
        System.out.println("5. @AfterAll - Global teardown");
    }
}
Output when running both tests:
1. @BeforeAll - Global setup
2. @BeforeEach - Reset state before test
3. Executing test A
4. @AfterEach - Cleanup state after test
2. @BeforeEach - Reset state before test
3. Executing test B
4. @AfterEach - Cleanup state after test
5. @AfterAll - Global teardown
Parallel Test Execution in JUnit 5
By default, JUnit 5 executes all tests sequentially on a single thread. For large test suites, parallel execution can dramatically reduce build times.
1. Enabling Parallel Execution
Create a file named junit-platform.properties in your src/test/resources directory:
properties
# Enable parallel execution across all test classes
junit.jupiter.execution.parallel.enabled=true

# Set execution mode for methods within the same class
junit.jupiter.execution.parallel.mode.default=concurrent

# Set execution mode across multiple classes
junit.jupiter.execution.parallel.mode.classes.default=concurrent
2. Controlling Parallelism in Code
You can override execution behavior using the @Execution annotation:
java
import org.junit.jupiter.api.parallel.Execution;
import org.junit.jupiter.api.parallel.ExecutionMode;

// Force this specific class to run in parallel
@Execution(ExecutionMode.CONCURRENT)
class FastCalculationTest {

    @Test
    void testOne() { /* runs concurrently */ }

    @Test
    void testTwo() { /* runs concurrently */ }
}

// Force legacy or stateful tests to run sequentially
@Execution(ExecutionMode.SAME_THREAD)
class SharedResourceTest {

    @Test
    void stepOne() { /* runs on same thread */ }

    @Test
    void stepTwo() { /* runs on same thread */ }
}
Rules for Safe Parallel Execution
- Avoid mutable shared static variables.
- If tests read and write to the same database table, wrap tests in database transactions that rollback, or run those integration classes in
SAME_THREADmode. - Keep tests self contained: any data created by a test should belong strictly to that test run.
The AAA Pattern: Arrange, Act, Assert
Every professional unit test follows the Arrange, Act, Assert pattern. It structures the test so any engineer reading it immediately grasps what is being prepared, what is being invoked, and what is being validated.
java
@Test
void withdraw_shouldDeductBalance_whenSufficientFundsExist() {
    // 1. Arrange: setup inputs, target object, and preconditions
    BankAccount account = new BankAccount("ACCT-101", 500.00);
    double amountToWithdraw = 150.00;

    // 2. Act: invoke the specific behavior under test
    boolean success = account.withdraw(amountToWithdraw);

    // 3. Assert: verify the results and expected state changes
    assertTrue(success, "Withdrawal should succeed");
    assertEquals(350.00, account.getBalance(), 0.001, "Remaining balance should be 350.00");
}
Why the AAA Pattern Matters
- Readability: Clear visual separation makes reviews fast.
- Single Responsibility: If your test has three Act steps followed by multiple Assert steps intermingled, the test is doing too much and should be split into smaller tests.
- Diagnostic speed: When a test fails on line 3, you immediately know whether setup failed, execution threw an error, or the assertion was violated.
Interview Questions & Pitfalls
Q1: What is the default test instance lifecycle in JUnit 5, and why was it chosen?
The default is Lifecycle.PER_METHOD. JUnit instantiates a new object of the test class before running each test method. It was chosen to ensure complete test isolation, preventing state pollution from one test leaking into another and allowing tests to run in any order or in parallel without race conditions on instance fields.
Q2: Why must @BeforeAll and @AfterAll be static in per method mode?
In per method mode, JUnit executes @BeforeAll before creating any instance of the test class. Because no object exists yet, the method must belong to the class itself, requiring the static modifier.
Q3: When would you intentionally switch to @TestInstance(Lifecycle.PER_CLASS)?
Two common scenarios: First, when you want to avoid static methods for @BeforeAll and @AfterAll, enabling clean inheritance or interface default lifecycle methods. Second, when testing a sequential state machine where initializing resources is very expensive, such as spinning up an embedded server or large in memory database once for the entire class.
Q4: How do you enable parallel execution in a Maven or Gradle project using JUnit 5?
Add a junit-platform.properties configuration file in src/test/resources containing junit.jupiter.execution.parallel.enabled=true and specify the default execution mode. You can then fine tune individual classes or methods with @Execution(ExecutionMode.CONCURRENT) or @Execution(ExecutionMode.SAME_THREAD).
Q5: What is the risk of using @TestInstance(Lifecycle.PER_CLASS) with parallel test execution?
If tests running concurrently access or modify instance variables on the shared test class instance, they will suffer from race conditions, thread visibility bugs, and unpredictable test results. In parallel environments, per method lifecycle is far safer.